


OG TOUR: Upstairs Bedrooms + Bath
Alright guys, we have taken you on a tour of the lower level of the OG, now it’s time to take a peek upstairs. With using only one 40 foot container, there is just enough room to tuck a couple of bedrooms, an additional bathroom, and a sitting nook. The trickiest part of putting a container up top, was determining where to place it so that it connected properly with the lower level. This took some extra brain power and a couple of different opinions to come up with the best-case scenario. All in all, it was a success!


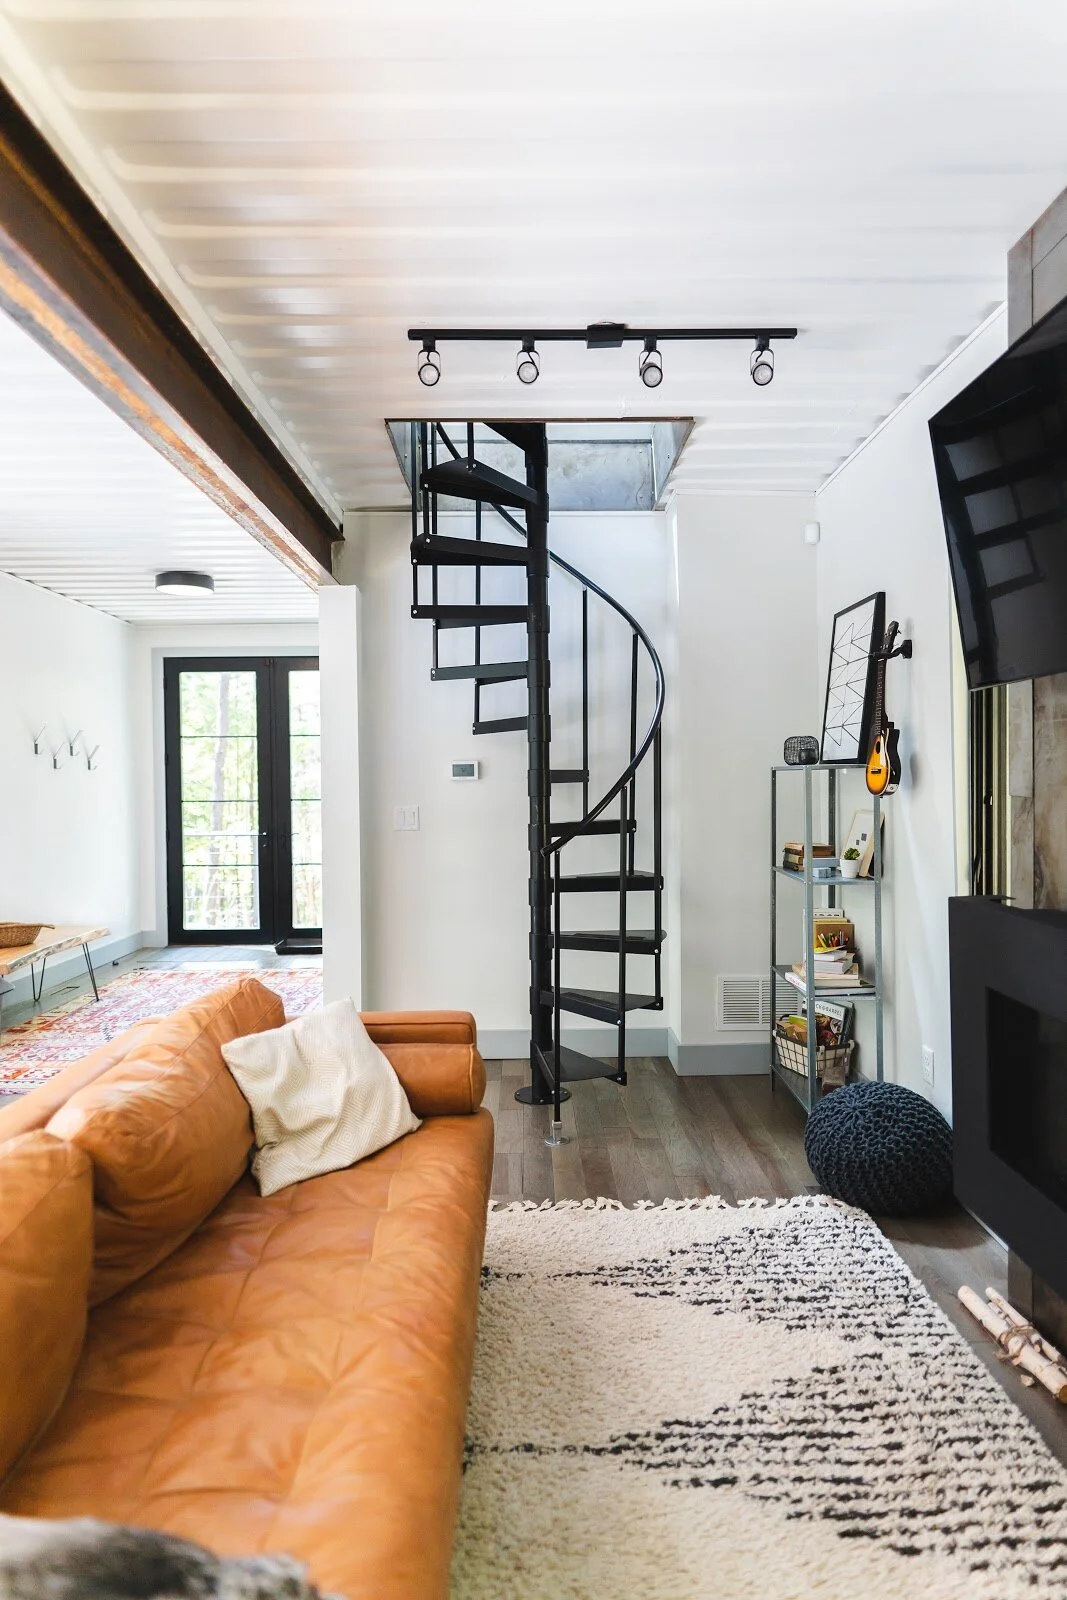
As you can see, the spiral stairs heading up are fairly tight! This was the best we could do when working with an 8 foot wide (really only 7 feet once framed) landing up top. The rough opening for the smallest staircase was 44 inches! We strategically placed the landing of the stairs in just about the middle of the container. This allowed for either bedroom to tuck in the end caps and make use of the space in the middle for a bathroom and this lofted nook to welcome you.
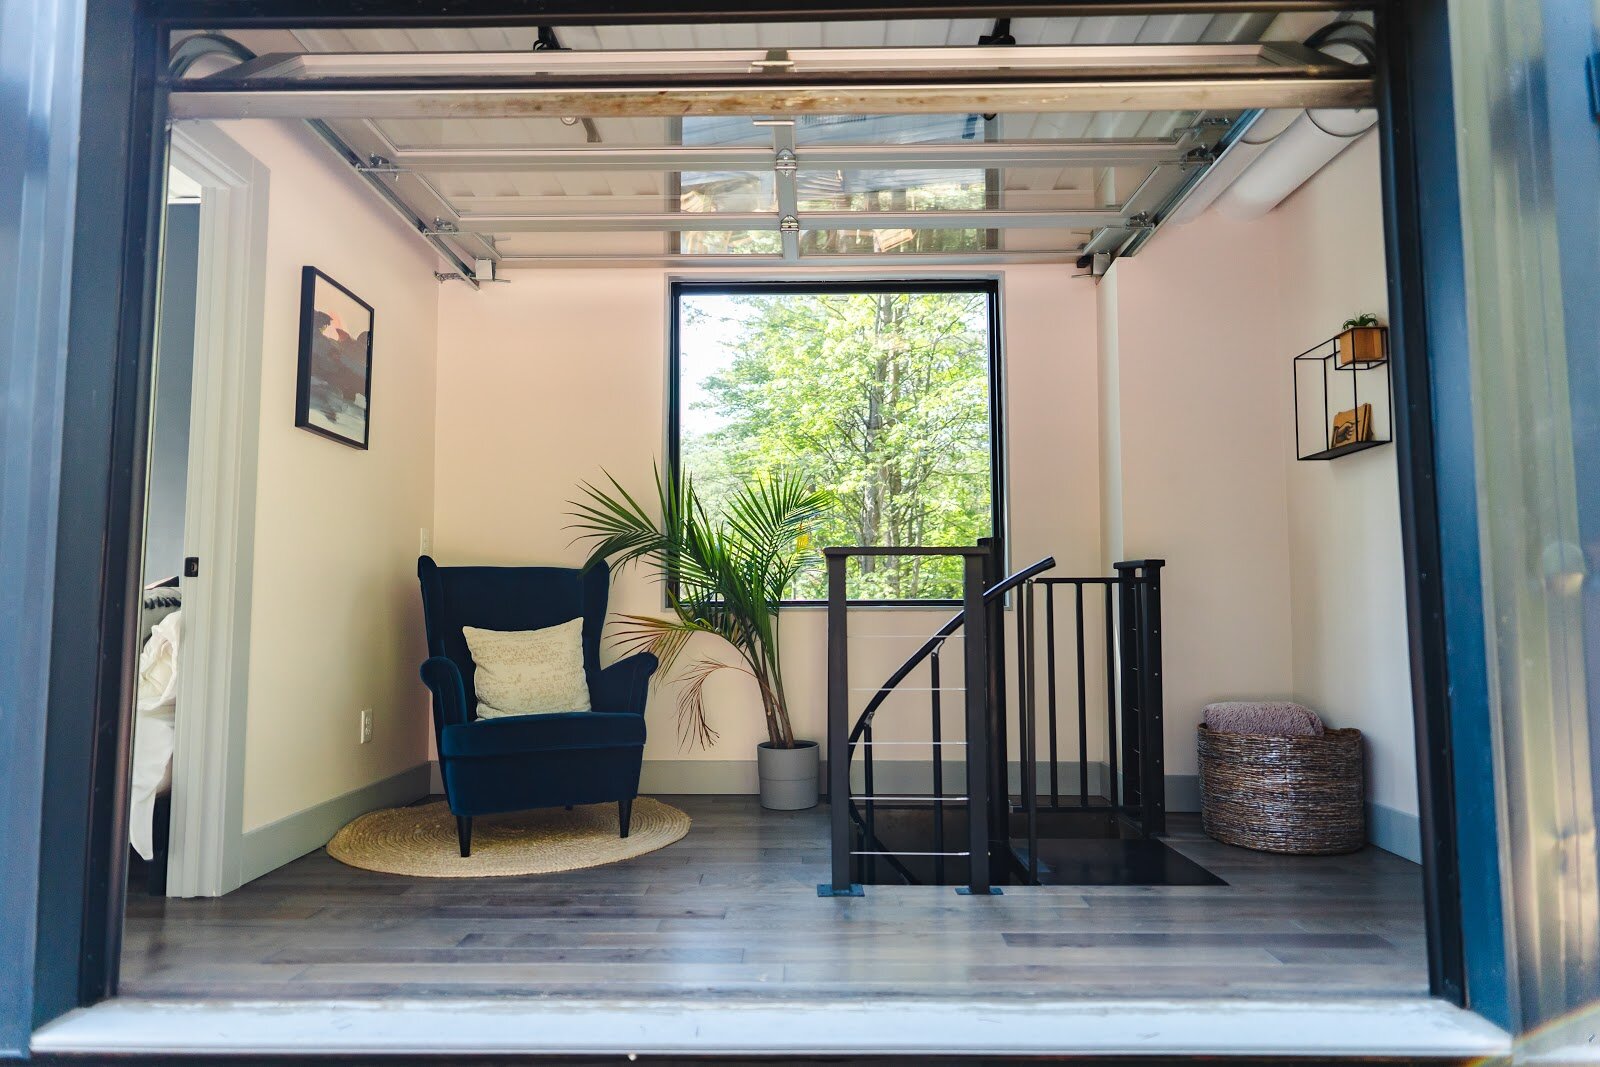

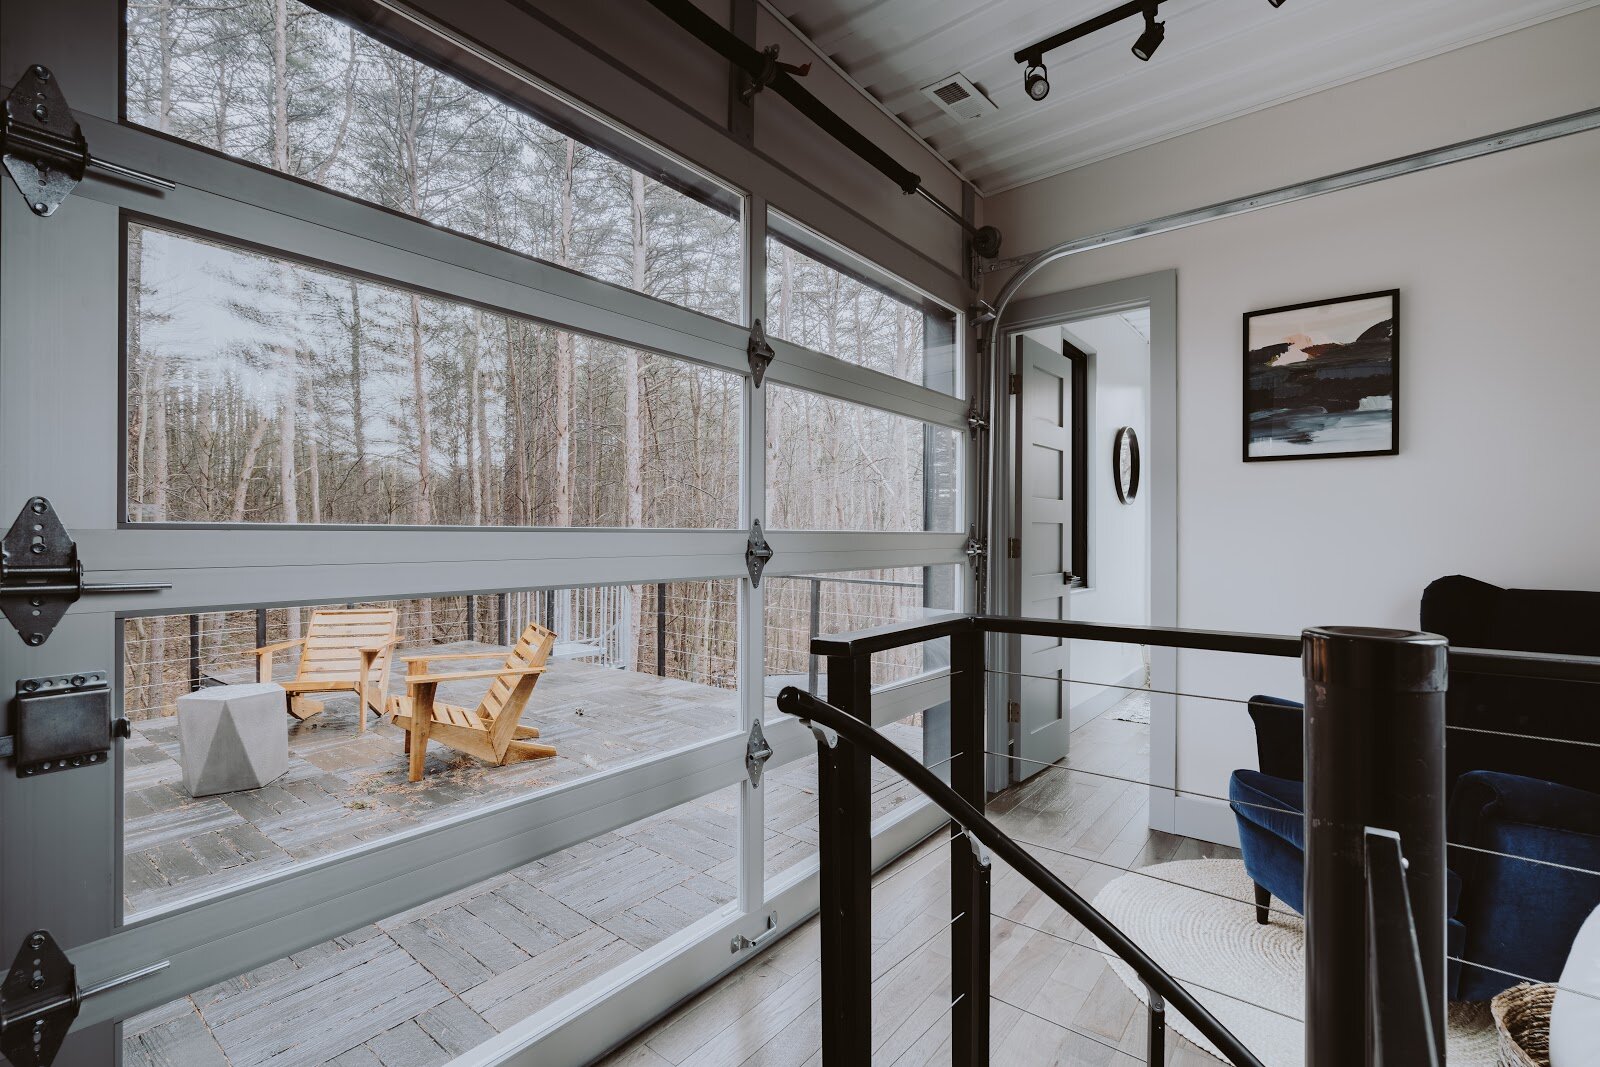
Rather than it feeling crowded or cramped once arriving upstairs, we kept it as open as possible with a simple, cozy reading chair and small end table. On top of that, it was important that there was an immense amount of natural light to keep from feeling cramped or tunnel-like. We put a large window on one side of the loft, and an all-glass garage door on the other side to let in loads of light and give access to the rooftop patio.


On one end cap of the upper container is our favorite bedroom of the OG. A vision from the beginning, we HAD to put in these huge, floor to ceiling windows. We wanted something magical that carried the bedroom from inside the house to outside; something that would bring a sense of peace and serenity as one in nature. This bedroom is cantilevered over the lower deck outside and has the most incredible view over the ravine. For the interior, we again kept it super simple and clean. We had enough room for a full-size bed, rug, some art, a mirror, a basket, and a couple of hooks on the wall to hang belongings. Because the room feels so open with the large window, we took a bold approach to paint one wall black that matches the exterior. For textiles, we also kept it basic with white linens, and a couple neutral throw pillows. Adding a bit of color, we put a mustard throw blanket to the bed.
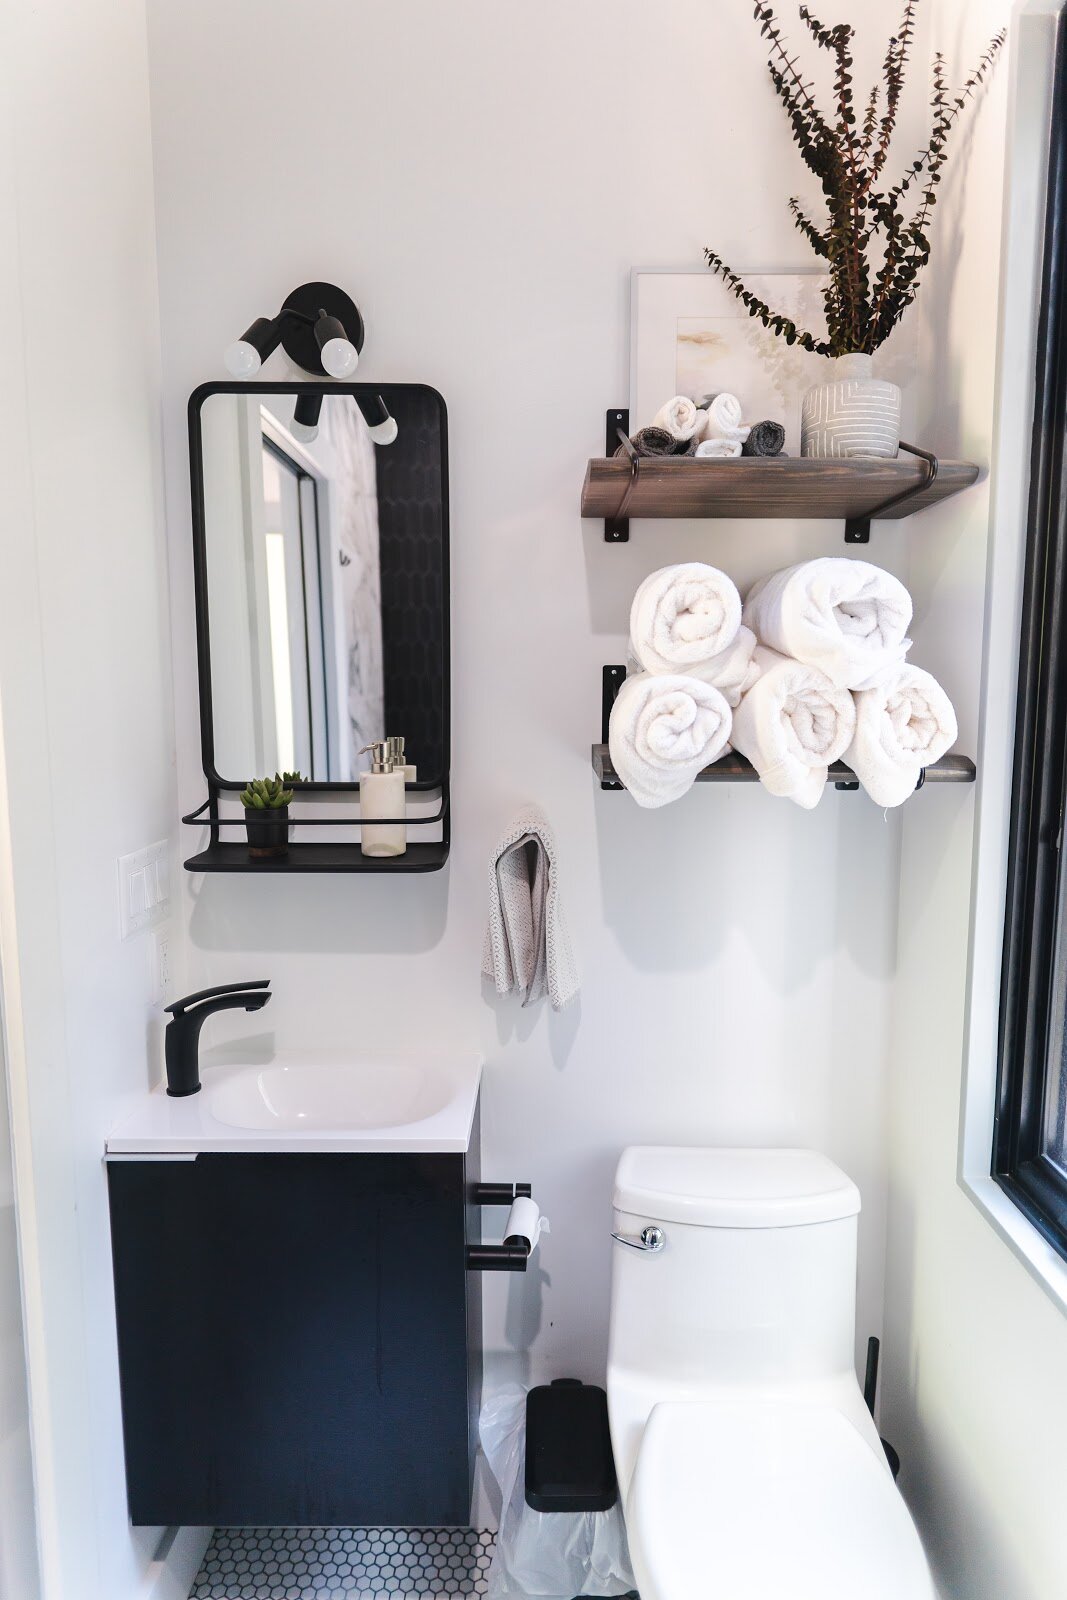


As you’re headed to the other end of the container, you will find the upstairs bathroom. Quaint as it may be, we tried our hardest not to spare any details. We used the same small vanity that we used in the lower level bathroom, except in black. We also used the same mirror and open shelves. The vanity light is a little daintier than the other bathroom, which fits really well into this space. We added small white hexagon tile for the floor and this flows really well into the stand-up shower (across from toilet). Off to the right of the doorway, the shower is separated from the rest of the bathroom by a single piece of glass. The shower base is a custom poured black concrete, the same that was used for the kitchen countertops. For the back wall of the shower, we used black picket tile and along the other two sides we used 12” x 24” ceramic marble patterned tile.


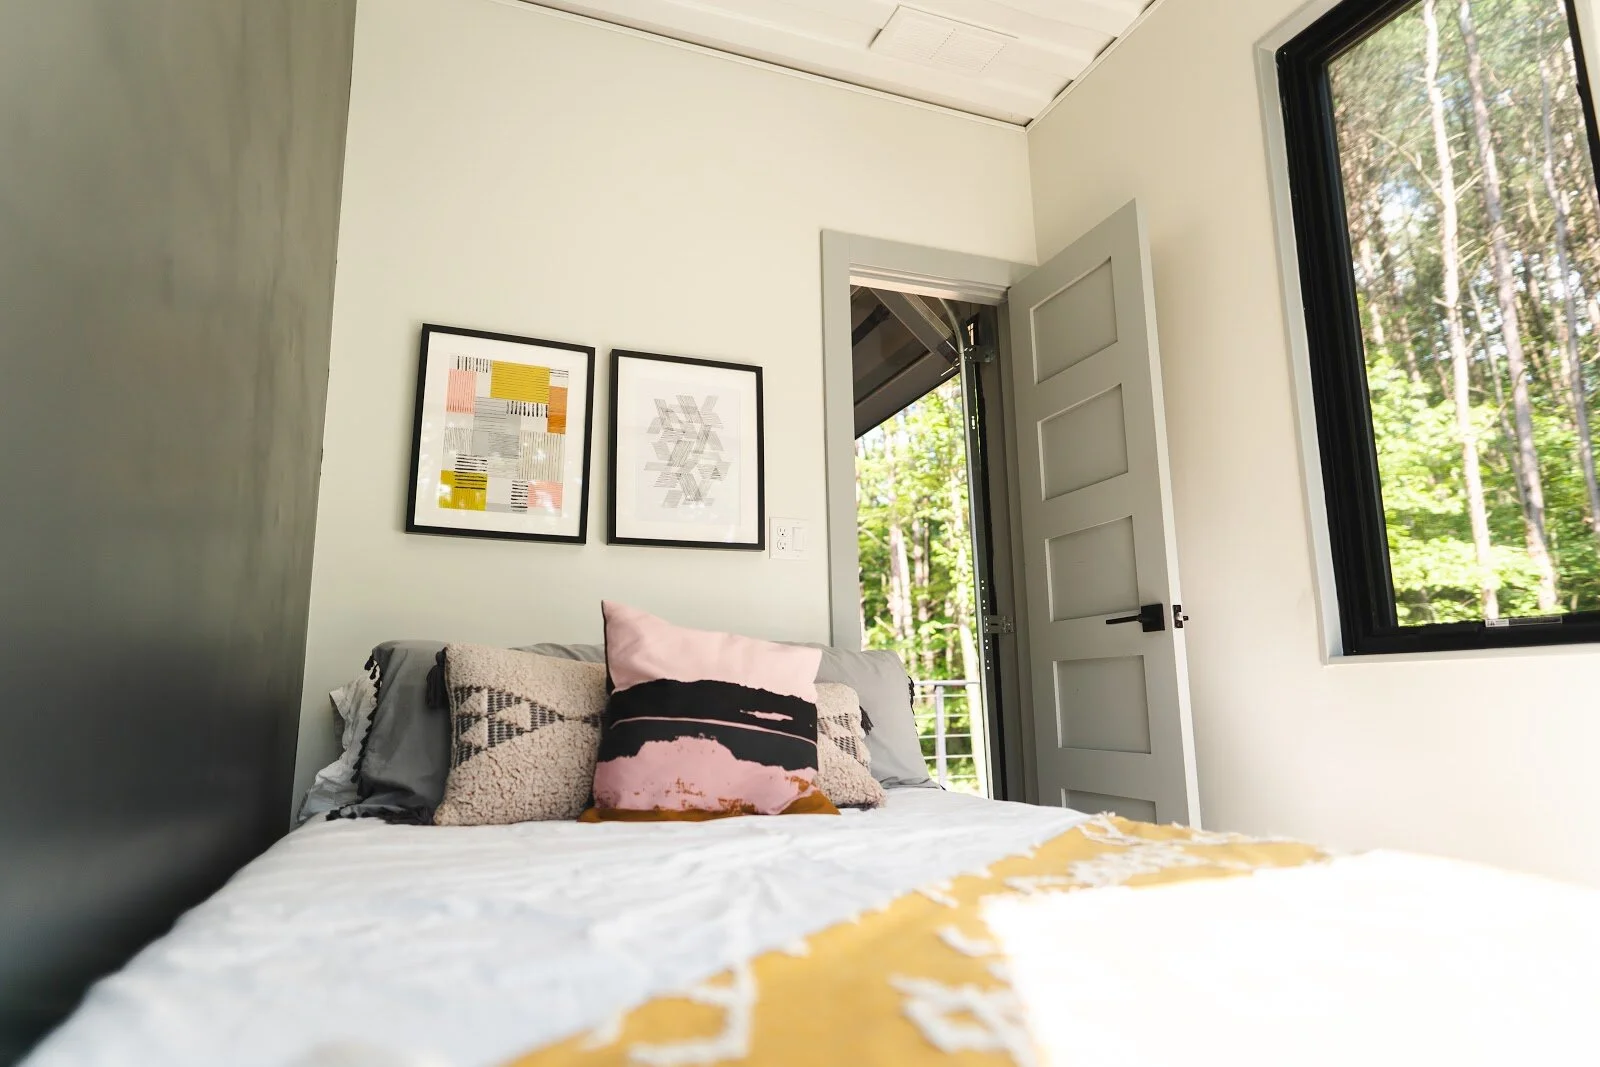
And last but not least, is the third and final bedroom of the home. This is the room that Mina (our eldest daughter) claims to be hers! With the same idea as the other bedroom upstairs, the full end cap of the room is a window that overlooks the wooded property. The interior of this room is lighter with pink-hued white walls, a simple wall art print, and the beloved custom DIY neon light art. Same as the other rooms, it’s situated with a full-size bed, white linens, a few throw pillows, a blue-gray throw blanket, a white braided rug, and a cozy floor pillow.


As that wraps up the interior of the OG, there is still so much more to show you on the exterior! Although the inside is what makes it a home, the outside is what makes this home so unique and special to us. It is what sparked our dream for the Box Hop, and gave us a vision for something out of the ordinary.
Again, there are so many details to see in person and words can only say so much. If you haven’t stayed with us yet, we would love to have you! Head to our website: theboxhop.com to check availability and find out how you can become an email insider for first notification of any upcoming cancellations in the schedule, as well as staying “in the know” for all of our upcoming blogs, newsletters and business growth!
We appreciate you so much—stay safe and healthy, friends.
OG Box Hop Tour: Living Room + Dining Space + Kitchen
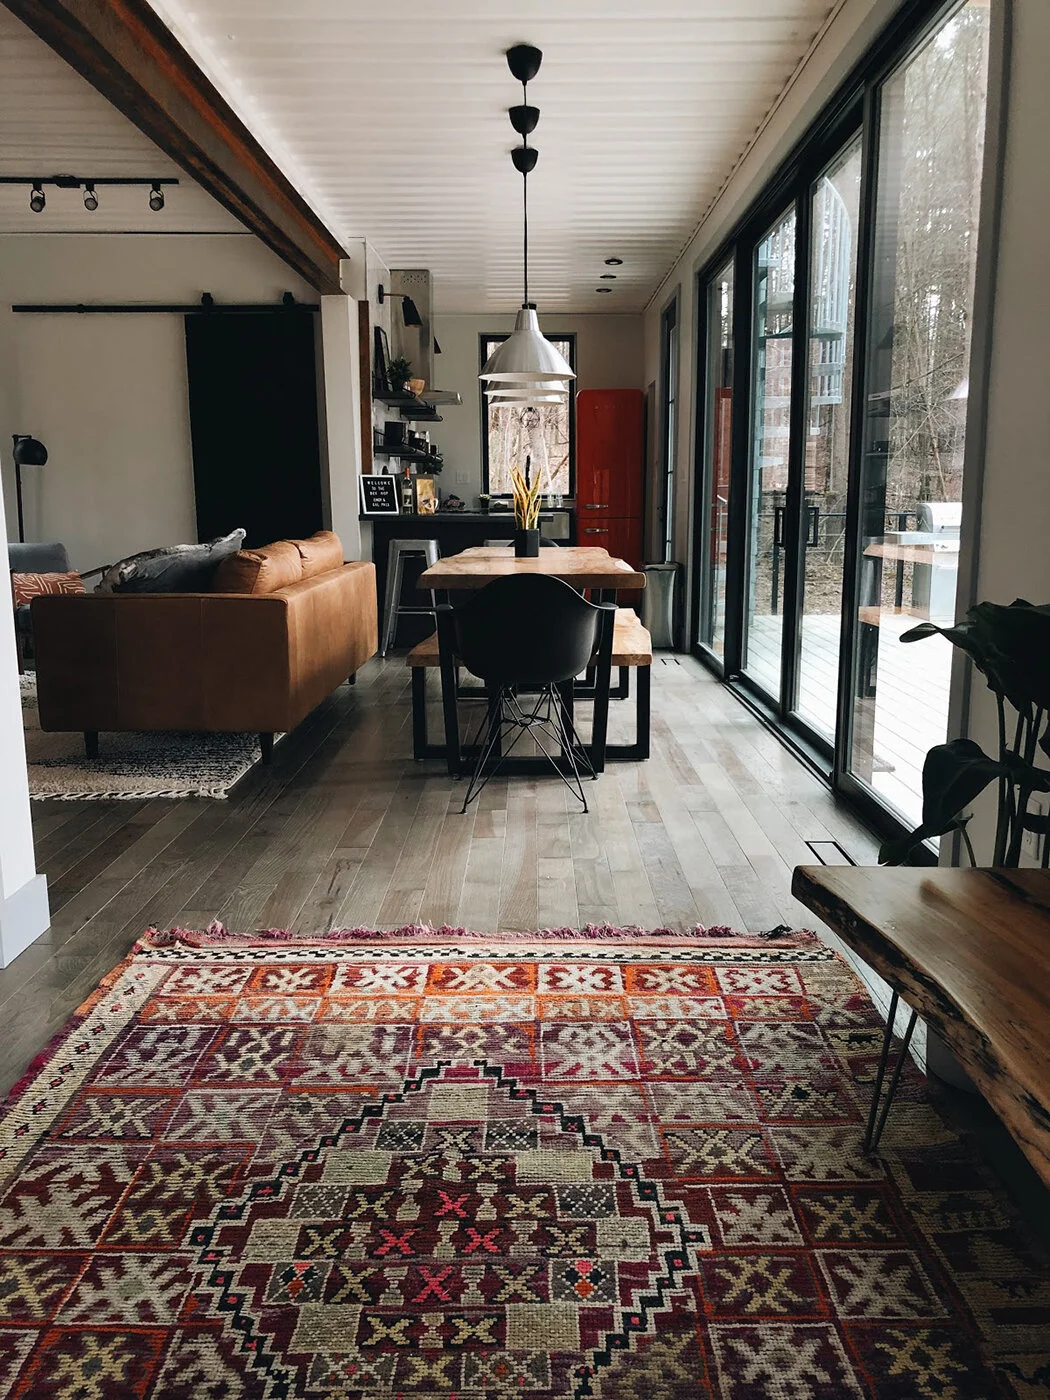
Okay—now we are getting to some of the good stuff! We are going to take you through a tour of the living room, dining space, and kitchen of the OG Box Hop. After you clear the entryway into the home, you start to get a sense of how things are laid out and connected. Utilizing an open concept, which is no easy feat when dealing with rectangular steel boxes, we mesh two containers together on the first floor pulling the living, dining and kitchen into one big gathering space.
When dreaming up the floorplan, it came to mind immediately that the two containers that ran parallel on the first floor would be almost completely opened up to one another to double the width. On one side is living space and the other is dining. Tying the two containers together for support and aesthetics, we used a 22’ steel beam. We originally planned to paint this beam black. However, mother nature did its thing and as the beam sat outside waiting to be installed, the weathering and rust brought out that pop of orange we envisioned for this home.


In our opinion, a cabin isn’t a cabin without a fireplace. We chose a modern and ventless gas fireplace for the living room since it has a small footprint and can still crank out a lot of heat. To bring more of the industrial/steel vibe into the space, we had a friend custom cut and install a steel backing behind the TV and fireplace. For lighting we went simple with track lighting that would brighten the space in all directions and not clutter the look. The couch was a bigger splurge piece that brought looks and comfort and we just couldn’t say no.


Windows were really fun to design in this home. Having the freedom to do a modern and non-traditional look, it made sense to get creative with their style. Slightly off-setting their heights brought so much dimension to the little space and allowed more light to come through. Finishing up, we went with a simple black and white rug, tucked a sitting chair and reading lamp in the corner, and hung up a flag next to our custom sliding door that leads into the laundry and utility rooms.


On the opposite side of the fireplace is the spiral staircase that heads to the second floor. This was super tricky to position in the home because it had to fit aesthetically on the first floor and it had to arrive properly in the space above. When we first cut a hole for a ladder to go upstairs, we misjudged this opening slightly and had to re-patch/weld the ceiling back together. With the awkward space just behind the stairs, we first added a Christmas tree since it fit the season :) Since then, we have added a small book shelf to house art, local magazines, and tiny living/cabin books. We can’t forget to mention Seth’s ukulele on the wall that added his love of music to the home.
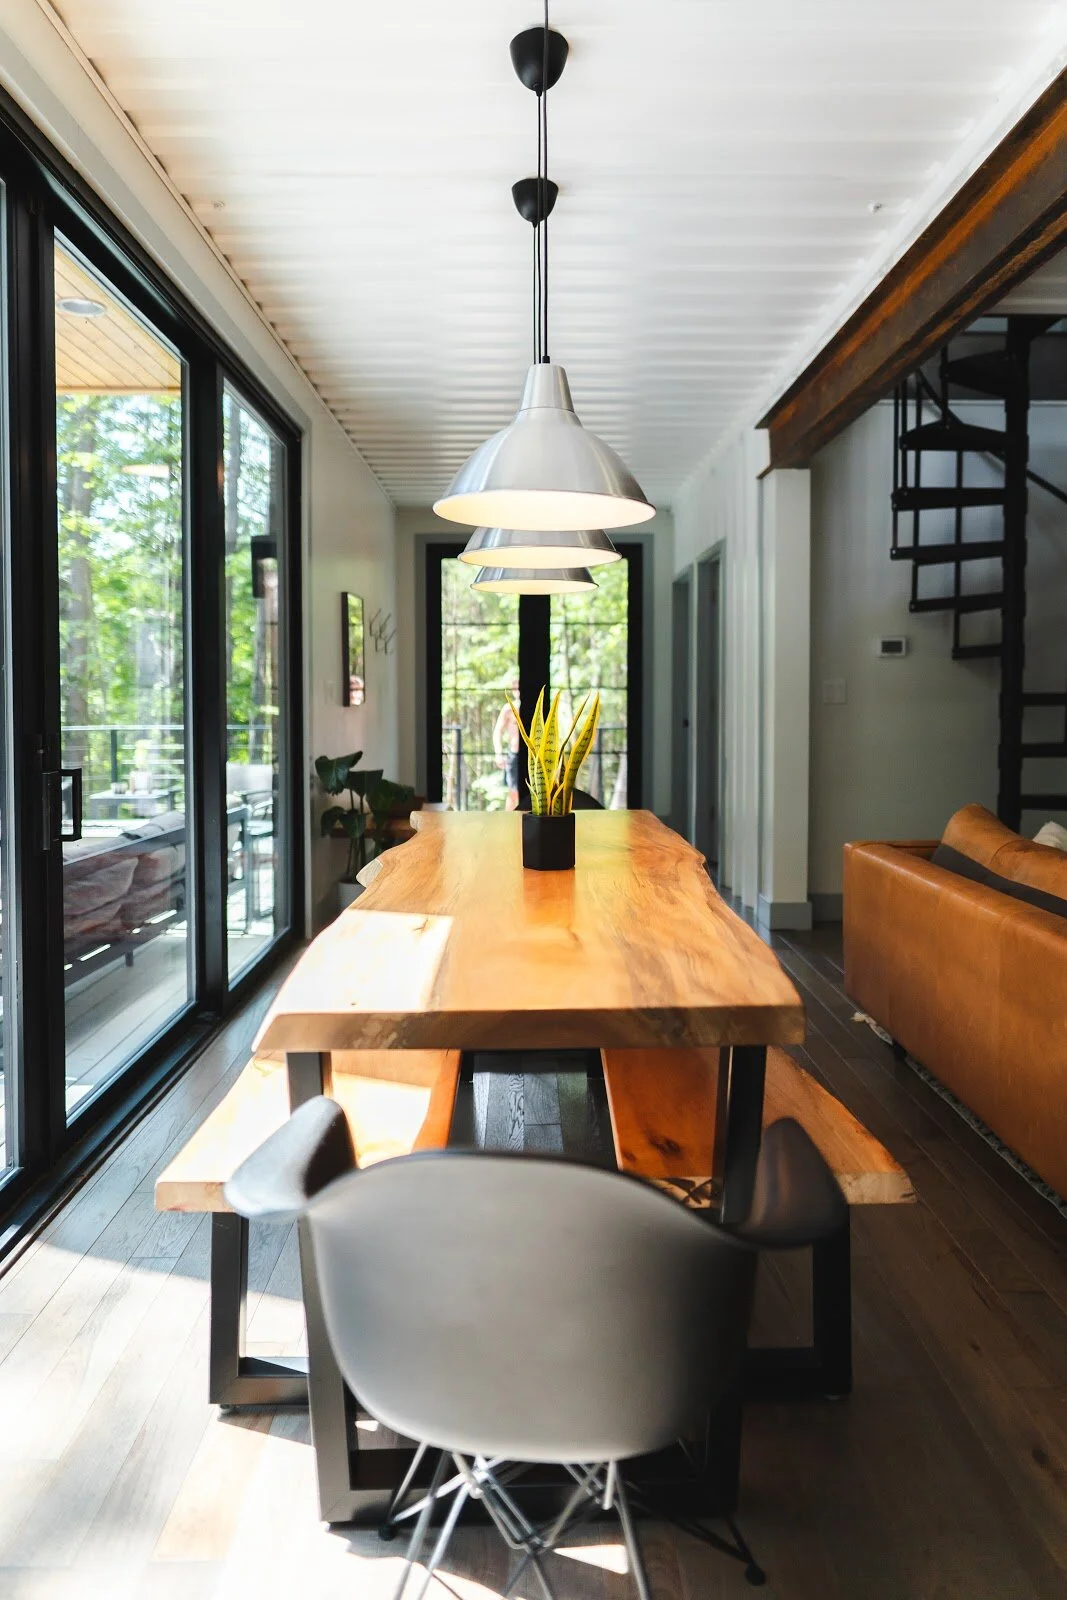

Just behind the couch is the central gathering hub—our amazing live edge sycamore table. Even though I wanted modern and edgy throughout the home, I also wanted an element of warmth and natural beauty. Our good friend who started his own carpentry business built us this table with matching bench seats to easily push in to save on space.
We also added a couple of end chairs to the table for extra seating. Next to the table on the wall, is probably one of the most expensive but necessary features of the home, the 16’ sliding glass door. Emily HAD to have this look and feel, and it truly changes the home, bringing the outside in and opens the space up to the outside world. The open wall allows for the three lower hanging table lights that again tie in that industrial feel.


One of the favorite rooms in any house, the kitchen! When configuring the layout of the house, it made the most sense to place the kitchen in one of the end-caps of the containers. There is enough space to create a galley/U-shaped kitchen comfortably and not take up too much real estate. We went with dark moody lower cabinets, and simple open shelves with tile to the ceiling above to keep from feeling crowded. There is a 20” range/oven (smaller than typical), an 18” dishwasher (smaller than typical) and a full-size stainless sink.
As you’ve probably noticed, the SMEG refrigerator is a statement all on its own! Inspiring the “pop of color” and color palette of the home, this fridge was central to the look and feel of what made up the OG Box’s modern, industrial, quirky and unique interior design. Fun fact: We offer a 6oz. bag of locally roasted coffee beans to each guest!
This layout for the first floor of the OG was essential to setting the tone and the standard for modern contemporary living. Not only using an open concept to pull together the main living areas of the home, but also by tying the outdoors into a part of the interior design is what makes the main body of the home feel spacious, alive and well-lived in. It is the central gathering for good food, great company and lots of fun. There are so many things that we didn’t go into full detail about, but you’ll just have to come check it out for yourself!
Visit www.theboxhop.com to book your stay!

BOHO TOUR: Master Bath + Entry
This beauty is our newly opened “Boho Box Hop.” We can’t believe it is complete! The Boho is our second box hop build and we couldn’t be more thrilled to share it with you. Inspired by the idea of a tiny home mixed with a contemporary container home, we off-set two shipping containers (20ft and 40 ft) to create an intimate getaway.
After completing the OG Box Hop, we didn’t want to stop the momentum and ideas we had flowing. The juxtaposition of the two container homes which are situated on the same piece of property boasts their entirely different vibes. With a more “homey” and quaint feel, the Boho is intended to set a warm, simple, and romantic tone.

Similar to the OG, we wanted you to approach the Boho by a longer walking path, allowing you to leave behind the hustle and become one with nature. The entrance to the Boho is simple, but as you look closer, you can see all the unique geometric angles incorporated into its design, including the entry deck, the windows to the right of the door, and the cedar trim that lines the ceiling above. No detail was spared—we wanted eclectic, modern, chic, and cozy.

As you enter the Boho Box, you are greeted with a small sitting/reading nook along with a tiny Morso woodburning stove. Being that the container is only 8 feet in width, it was tricky figuring out how to make an entrance such as this to be inviting and not feel as if you were walking into a wall. We felt that this was the perfect way to welcome those coming to hunker down. Adding dimension to the space, we brought the kitchen tile onto the floor just beneath the stove. Hanging on the wall is a favorite local artist's woven art and next to the chair are a few small built-in shelves for books to sit, and trinkets to entertain.

To the left, once you have entered the home, is the doorway that leads into the bathroom—one of my favorite rooms to design. Fun fact, the only doors inside the entire home are those in the bathroom. For a flare, they are painted a light champagne pink. As you enter, there are lots of textiles to admire. From the large carnation wallpaper, marble subway tile beneath the mirror, olive penny tile on the floors, and the massive red oak sliding door, we absolutely love how this room turned out. The sink vanity is a custom piece in which we took a small buffet, added a quartz top and vessel sink. With all brass accents, the faucet, sconces, and mirror pull it all together.

Just across from the vanity is another beloved favorite feature of the home. This amazing cast iron clawfoot tub is what dreams are made of. This tub doubles as a shower and again boasts all brass fixtures. We really wanted to top the charts in luxury for this bathroom and decided to add a towel warmer. Adding one more element of design, the wall behind the tub is tiled three-quarters of the way up with a pearly scalloped tile and if you look up from there, you’ll see the skylight that allows for daydreaming or star gazing while taking that relaxing soak.

And last, but certainly not least, are two areas of the bathroom that are tucked away on their own. The first, off to the right of the tub, is it’s very own toilet room. Seth was insistent that luxury meant keeping this space for itself…Emily wasn’t mad about it AT ALL. Finally, behind the gorgeous red oak slider, is the laundry area with a standup washer and dryer for guests to use at their leisure.
-
Where the Boho is much smaller than the OG, there are so many intricate details that we wanted to incorporate into the design and are going to be so fun to share with you. The OG holds a special place in our hearts, always, but there is something sweet about the Boho that has us captivated and still pinching ourselves that it is ours. Can’t wait to show you more!
XOXO

The OG Box Hop Tour: Master Bath + Master Bed + Entry
Well guys, here we go with our first blog post on The Box Hop!! What a journey it has been. For some time we have wanted to share our thoughts and dreams intimately with you and it is our pleasure to walk you through our spaces to give a more personal insight on what went into creating The Box Hop.

So, a big part of what we wanted people to feel when they approached The Box Hop was a sense of belonging to nature. We didn’t want the driveway to go right up to the house, as we wanted it to stay completely surrounded by trees with a small footprint. Once you park and walk up the long mulch path, you are greeted by The Box in all its glory, peacefully tucked in with the trees.
Upon entry via the front doors, you are able to look down the length of the home and see how everything has been placed together. A vintage rug from a friend that owns a local boutique introduces the subtle pop of color in the home, a custom live edge bench from another friend and local carpenter off to the right offers a place to tuck belongings or shoes, and right above it is an amazing art print from a local artist in Columbus, OH.

Immediately inside the home, if you look to your left, you will see the doors to the first two rooms that are situated in the front corner of the home. The first room is the “master bedroom.” The reason we call this bedroom the “master” is simply because it has direct access to the bathroom via a pocket door and it is conveniently located on the first floor. Our goal was to keep the bedrooms small, simple enough for sleeping, and utilize all the space we could gain for the living and common spaces of the home where people gather.


Because this bedroom is on a corner of the house that is on the path to approach the entrance, we didn’t want to have big windows that would disrupt privacy. Rather than adding boring windows and blinds, we choose a unique design of ours to add transom-like horizontal windows in an abstract orientation along the top of the room. This way, you still get loads of natural light from the southern exposure of the sun, as well as dim evening sun as it sets west. With the bed centered, we added sconces for a bit of extra reading light. Throw down a natural jute rug, add a throw blanket for snuggles and a corner ladder for hanging any clothes, towels etc. and wa-la!

The second door when you enter the home is the first-floor bathroom. Again, trying to utilize space while also offering luxury, we added this soaking tub and shower combo. We went with all black fixtures and contrasted them with all-white tile. In addition, we painted the ceiling black for a unique flare. It was NO easy feat getting that tile in, but we think it was totally worth it!

Open shelves with custom brackets from a local vendor above the toilet was another functional space saving feature. We were able to display the towels neatly and still sneak in some art just below. Tucked in the corner is the small floating vanity/sink. In hindsight, we probably would have chosen a slightly bigger setup, but it gets the job done without making the bathroom feel crowded.
We are super excited to begin this journey of blogging with you and are happy to share some of our insight and resources. The Box Hop is truly a reflection of our desires—to be creative and to love on people. It is our hope that you get to experience this with us. Head over to our website, theboxhop.com, and read more about our story, our spaces, and how to book your stay. Thank you all for the continuous love and support and stay tuned for more!